My twin babies turned 1 year old last month. Craziness.
For there first birthday (which you can read more in detail about HERE), I threw them a "Brown Bear Brown Bear" themed party. For the cake, I knew I wanted to do something awesome. I'd seen a few rainbow layered cakes floating around Pinterest. I thought since the book has all rainbow colored animals in it and I was planning on using a bunch of rainbow colored things for the party, that this cake would be perfect!
It was a 6 layered cake, each layer a different color of the rainbow. Here are step-by-step instructions of how I made it:
First off, let me apologize. I cheated a bit with this cake. I used boxed cake mix. I had so much other stuff to do for the party, and my family was in town, it was just easier. Sorry! Anyway, I mixed up a batch of 2 boxed cake mixes. I then divided all of the cake batter evenly between 6 medium sized bowls, one for each color. I then added food coloring to each bowl, mixing until the color was pretty vibrant, as it will bake to be the same color as is mixed. After that, I baked each layer separately (only because I had 1 pan).
After all the layers were baked and completely cooled, I placed the bottom layer (I used purple on the bottom) on the cake stand/plate. I then trimmed off the top of the layer, making a smooth surface, and spread a generous amount of icing on top. I then placed the next colored caked on top, gently pressing down to stick to the icing.
I continued to trim off the tops and layer the cakes, until all layers were there. Trim off the top layer also, so that the top of the cake is flat.
Next, I had to trim the sides of the cake, to round everything out and make it smooth. You'll make a huge mess, and it will look like a rainbow exploded in your kitchen.
Next, I frosted the outside of the entire cake. It is easiest to do this on a turning cake stand, so that you can just put icing on a knife, hold the knife still against the cake, and turn the stand. It ices much smoother than moving the knife all around.
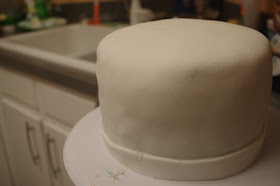
Then we rolled out the fondant (bought a box of it at Walmart), and made sure it was big enough to cover the entire cake (we actually did tape measure measuring). Once rolled out, carefully place over cake, covering it completely. I put a fondant ribbon on the bottom, to cover a few places where the fondant wrinkled.
I drew some of the animals from the book, and then cut out the shapes from gum paste. Gum paste is similar to fondant, except it hardens up a bit more. We had to work quickly so that the gum paste wouldn't harden before we stuck the shapes onto the cake.
Then comes the fun part! I found edible cake markers at Walmart, and colored the gum-paste animals to look like those in the book.
Then I just wrote Happy Birthday, and wrote a line from the book on the ribbon around the base of the cake, and that was it!
**The very first photo and these last 4 photos were all taken by Lane, of
www.meredithlanephotography.com


Hi, You did a great job and I have a quick question. Did you hand draw the animals yourself? Where does one get GumPaste?
ReplyDeleteThanks for stopping by and for your comment! I did draw the animals by hand. I found gum paste at walmart with all the other cake decorating tools. I've also seen it at Micheals, beside the fondant.
DeleteWow..those animals look exactly like the book. I must say you are very talented! I am hoping to pull off this theme for my daughter's first birthday in December but I am not sure I can as good a job as you! Thanks for your post :)!
DeleteI bought gum paste and will attempt to make these this weekend and wondered if you can tell me how long the gumpaste animals will last and how you store them? In fridge/outside etc? Thank you so much!
ReplyDeleteThe gum paste animals can be kept at room temp. I actually still have mine, in plastic baggies with my scrapbook stuff. Good luck with your daughters cake! I'd love to see your finished project!!!
DeleteYou have really given a great reliable baking idea. I will try these in making cup cakes for our kitty party. One of the budgeted venues in NYC is already hired online with tasty cuisines. Games and other activities will be done to make the atmosphere frolic. Also searching for gifts and wraps for all winners.
ReplyDeleteSmm panel
ReplyDeleteSmm Panel
iş ilanları
instagram takipçi satın al
HIRDAVATÇI BURADA
BEYAZESYATEKNİKSERVİSİ.COM.TR
SERVİS
TİKTOK PARA HİLESİ İNDİR
en son çıkan perde modelleri
ReplyDeleteyurtdışı kargo
uc satın al
nft nasıl alınır
minecraft premium
lisans satın al
en son çıkan perde modelleri
özel ambulans
Success Write content success. Thanks.
ReplyDeletebetmatik
deneme bonusu
betpark
canlı poker siteleri
kıbrıs bahis siteleri
kralbet
betturkey
Good content. You write beautiful things.
ReplyDeletevbet
vbet
hacklink
korsan taksi
mrbahis
taksi
sportsbet
mrbahis
hacklink
marmaris
ReplyDeletemecidiyeköy
milas
pamukkale
pendik
OFRQRZ
gümüşhane
ReplyDeletehakkari
alsancak
bilecik
arnavutköy
EW4
yurtdışı kargo
ReplyDeleteresimli magnet
instagram takipçi satın al
yurtdışı kargo
sms onay
dijital kartvizit
dijital kartvizit
https://nobetci-eczane.org/
0MO8J
urfa
ReplyDeleteantakya
ısparta
aydın
diyarbakır
WRB6NW
شركة صيانة افران بالاحساء Ituyn21j8s
ReplyDeleteشركة تنظيف منازل بخميس مشيط OVBUham8Ec
ReplyDeleteشركة صيانة افران الغاز
ReplyDelete10Py1DiAOP