Showing posts with label Copycat recipe. Show all posts

11.04.2012

"Chicken" Fried Tofu


An exciting outing for me is going to Trader Joe's and/or Whole Foods.  I don't get to go to either of them very often, since they are on the opposite sides of town from where we live.  The Kroger down the road is just much more convenient and cheaper to buy the bulk of our groceries at.  But there are the occasional times that I get the chance to go to one of the most awesome grocery stores.  The last time I went to Whole Foods, I took the boys with me.  After shopping for a bit, we had lunch at store as well. Whole Foods has a lot of vegan/vegetarian friendly foods, and one of the things that the boys and I ate there was "chicken" fried tofu.  The boys loved it, and I was a fan as well.  It really did taste like fried chicken, with a little bit different texture.  I searched some recipes online and found a pretty good copycat recipe.  I made these for dinner one night at home, and they were awesome! 


"Chicken" Fried Tofu
from whiskflipstir.com

1 14-oz pkg extra firm tofu, drained and pressed
2 cups double strength chicken-flavored vegan broth (I used THIS kind)
1/4 cup vegetable oil
1/2 cup flour
3 Tbsp nutritional yeast
1 tsp salt
1/2 tsp black pepper
1 tsp poultry seasoning (I used goya)
1/2 tsp dried garlic
1/2 tsp dried minced onion
1/2 tsp cayenne pepper

Cut tofu into squares or strips.  Place tofu in a shallow pan and cover with the broth.  Soak at least one hour, and up to overnight, in the refridgerator.  After tofu has finished marinating, Stir together the flour, yeast, and spices in a bowl.  Warm oil in a large skillet over medium-low heat.  Remove tofu from broth and roll each piece around in the flour mixture until covered.  I did a second breading also...dunk again into the broth, and then again into the flour/spice mixture.  

Place tofu in hot oil and fry until brown and crisp on all sides (about 2-3 minutes per side).  Remove from oil and set on a plate lined with paper towels to drain.  

Serve and enjoy!    


10.05.2012

Maple Cream Cookies


I've been wanting to make these cookies for a very long time.  Ever since I first had Trader Joe's Maple Leaf Cookies, I have wanted to try my own recreation of them.  Once a month at my work, we have a big pot-luck style feast to celebrate the birthdays in that month.  I thought bringing these cookies would be appropriate, since it's also the beginning of the best season ever.  Hoodies.  Bonfires.  Haunted houses and halloween parties.  Thanksgiving.  Hot drinks.  Pretty leaves.  Perfect weather.  best. season. ever.  


These cookies smell like pancakes.  Crumbly, buttery shortbread cookies with maple-flavored cream cheese icing in between them.  They're awesome!  and possibly maybe even a little better than the Trader Joe's original.  But only because they're homemade.  I didn't have any leaf cookie cutters, but I did have a leaf press that I usually use on pie crusts, so I used that instead. 


Maple Cream Cookies
Adapted from Gourmet and Martha Stewart

For the cookies:
1 cup unsalted butter, at room temp
1 cup sugar
1/2 cup maple syrup (use grade B if you have it!  That's the good stuff)
1 egg yolk
3 cups flour
1/4 tsp ground nutmeg
1 tsp salt

For the maple cream:
1 pkg cream cheese (8 oz), at room temp
1/2 cup unsalted butter, at room temp
2 tbsp maple syrup
1/2 tsp pure vanilla extract
2 cups powdered sugar


For the cookies:  Beat together the butter and sugar, until light and fluffy.  With the mixer running, add in the egg yolk and slowly pour in the maple syrup.  In another bowl, whisk together the flour, nutmeg and salt.  Add to butter mixture until just combined.  The dough will be pretty clumpy.  Press together lightly and wrap tightly (ha, rhymed there) with saran wrap.  Chill in the fridge for at least 2 hours.

Preheat oven to 350 and line baking sheets with parchment paper (or your favorite non-stick method of cookie sheet preparing).  Roll out the cookie dough to about 1/8 of an inch thickness.  I did this in portions, so that the dough I wasn't using wouldn't get too warm while waiting to be cut.  Cut into desired shapes, and repeat with remaining dough, until it's all used up.  

Bake for 8-11 minutes, until edges are lightly golden.  Allow to cool completely before icing.

For the maple cream:  Beat together the cream cheese and butter until smooth.  Add remaining ingredients and  mix again until smooth and spreadable.  

Spread about a Tbsp of icing on the bottom side of one cookie, and sandwich the cream with another cookie.  Make sure the cookies are completely cooled before you do this step, otherwise the icing will melt and become too runny.  

Enjoy!!!  


4.14.2012

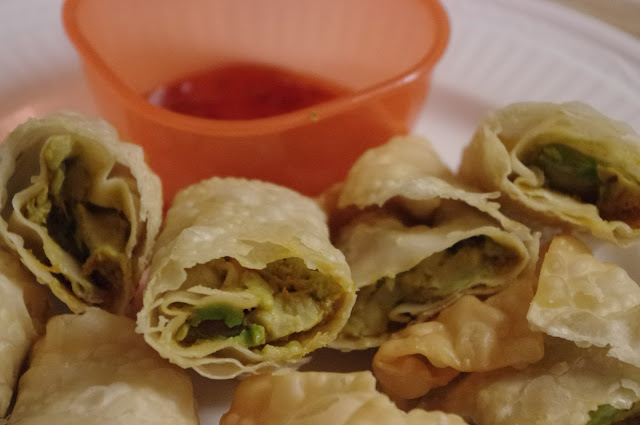
Avocado Egg Rolls


Avocado egg rolls.  These little guys are so addicting.  I had a few extra avocados lying around that needed to be used up before they turned too ripe, so I researched some interesting avocado recipes and landed on egg rolls.  Most of the searches that I found were comparing recipes to that of the Cheesecake Factory's version.  Although I've never had theirs, I've heard they're pretty darn good.  Well, these are suppose to be a copycat recipe of those, so if you like the one from the CCF, you'll probably like these!


Sundried tomatoes mixed with creamy avocado, cilantro, and crunchy red onions all fried up in a crispy shell.  They're sooooo good.  I used a sweet-chili dipping sauce to go with them.  The first time I made these, I was at home alone, and I may have eaten the whole plate by myself and called it dinner.  maybe.


Avocado Egg Rolls
adapted from MsVegan

1 large avocado, peeled, pitted and diced
2 Tbsp sun-dried tomatoes, chopped
1 Tbsp red onion, minced
2 cloves garlic, minced
1 tsp fresh cilantro, chopped
1/4 tsp salt
6 (ish) egg roll wrappers
oil of choice for frying

Stir all the ingredients together and stir until combined.  Place a Tbsp or 2 of filling into the center of each wrapper.  Starting with a corner, fold up to cover about a 1/4 of the filling.  Brush the rest of the corners with a little water.  fold in the side corners, and then roll up the last.  Press gently to seal.  Repeat with the rest of the wrappers and filling.

heat oil in a deep pan over medium high heat.  When the oil is about 350-380 degrees, add the egg rolls and let them fry for 2-3 minutes each side.  Once browned, transfer them to a paper towel-lined plate to drain excess oil.  Slice diagonally in half and serve with dipping sauce of choice!


3.19.2012

Homemade Oreos


I've been wanting to make homemade oreos for a while now.  I found last week to be the perfect opportunity because it was the week of the Oreos 100th birthday! (March 6th, to be exact).  I have a minor (ok, major) obsession with oreos, and the homemade version is just as good as the well-known packaged cookie (in my opinion, anyway).


This version is different only slightly in taste, but definitely so in texture.  These oreos are softer than the the crunchy originals.  These do have a little crunch to them though.   


The creme filling is pretty much identical, and the not-so-chocolately taste with a hint of salt very much resembles a store-bought oreo also.  I tried to made a few little impressions on some of them using my pie dough presses, as you can see if you look closely at a few of the pictures.

We enjoyed these with a cold glass of milk!


***OH...about the header and "...Gone Vegan" part:  Our little family has decided to go Vegan.  No meat, and no dairy.  I'll do a separate post soon about our reasons why and what our approach will be.  This here blog will be transitioning to a vegan-recipe blog for the time that we will be vegan (we're hoping for it to be a permanent change, but aren't quite sure yet).  But as for now, during our transition, some non-vegan recipes (such as this one) will still be seen here.

Any of you vegans out there are more than welcome to share your advice to us newcomers!


Homemade Oreo Cookies
Slightly adapted from SmittenKitchen

for the dough:
1 1/4 cup flour
1/2 cup unsweetened dutch-processed cocoa powder
1 tsp baking soda
1/4 tsp baking powder
1/4 tsp salt
1 cup sugar
1/2 cup + 2 tbsp butter, room temp
1 large egg

for the creme filling:
1/4 cup butter
1/4 cup vegetable shortening
2 cups confectioner's sugar
2 tsp vanilla extract

Prehead oven to 375.  In a mixer or food processor, mix together the flour, cocoa, baking soda, baking powder, salt and sugar.  While mixing on low speed, add the butter first, then the egg.  Mix until well combined.  Put spoonfuls of dough onto parchment-paper-lined baking sheet.  slightly flatten the dough with the palm of your hand.  Bake for 9 minutes, rotating the pan halfway through baking.

For the cream, beat butter and shortening on low speed.  gradually beat in the sugar and vanilla.  mix on high and beat on high for 2-3 minutes until light and fluffy.

Put the cream filling in a pastry bag with a big tip (or put in a zip lock bag, and cut off a corner).  Squeeze out tsp sized blobs on the bottom of one of the cookies.  Top with another cookie, giving gentle pressure to spread out the filling. 

Enjoy!


1.28.2012

Homemade Reese's Peanut Butter Cups


Have you every thought about Reese's peanut butter cups and how they are made?  Maybe I'm weird, but I have often thought of how I could recreate them at home.  I searched a few different recipes, and using bits and pieces from each of them, I figured out a delicious little snack thats impressive and pretty!  I think these are just a good if not better than Reese's.  I The filling is creamy, the chocolate has a little crunch and salt on top adds an awesome touch.  I didn't get the Reese's brand peanut butter, but those probably would made them taste even more legit.  My only complaint is that unless they are eaten immediately from the fridge, they will get soft and crumbly while sitting out at room temp for a while.  


Homemade Reese's
Adapted from multiple places, but mostly missanthropistskitchen.com

1 cup creamy peanut butter (Reese's brand, if you'd like)
1 1/2 Tbsp butter
1/2 cup confectioner's sugar
1/2 tsp salt +more for sprinkling on top.
2 cups semi-sweet chocolate chips
4 milk chocolate candy bars, (1 1/2 oz each), coarsely chopped --I used Hershey's.

Combine 1/2 cup peanut butter, butter, confectioner's sugar, and salt until smooth.

In the microwave or a double boiler, melt the chocolate chips, chopped up chocolate bar, and remaining 1/2 cup peanut butter.  Stir together until smooth.

Drop a few teaspoonfuls of the chocolate mixture into the bottom of paper-lined muffin trays.  Top each with a dollop of the peanut butter mixture (I found this easier to do by putting the peanut butter in a pastry bag, and piping it out into the middle of the chocolate).  Top with another teaspoon or 2 of the chocolate mixture, enough to cover the peanut butter.  Put in the fridge to chill until set firm.  About 45 minutes into chilling them, remove them from the fridge and sprinkle large salt crystals (like fleur de del or kosher salt) onto the top of the cups.  

That's it!


9.28.2011

Pizza Rolls


Totino's Pizza Rolls are nasty.  

Jeremy loves them.  I used to eat them when I was younger, but I can't stand them now.  I don't think they taste good and I haven't even looked at the nutritional side of them, but I'm sure there's not much to stand for on that end.  I sent Jeremy out grocery shopping one day and he came back with a bunch of junk food, including an enormous bag of pizza rolls.  And he ate the whole thing...in like 2 days.  He even has a certain way of arranging them on a plate so that they all microwave and cook through evenly.  I should have taken a photo of it, cause it's pretty ridiculous.


I made my own pizza rolls once before, at our Gender Reveal Party.  Everyone loved them and they were gone quite quickly.  So quick that Jeremy did not get to try one.  Since Jeremy said that he was craving pizza rolls, I decided to make them once again.  The first time I think I used store-bought pizza dough, but this time I made my own dough instead.  I thought they were much better with the homemade dough.  They're filled with typical pizza sauce and toppings, baked and then brushed with garlic butter.  They're delicious, and my Totino's-loving hubby totally approved.  


I didn't really use a set recipe on these (except for the dough), and the filling possibilities are endless (eggs, cheese, peppers and onions for a breakfast version?).

Pizza Rolls

Pizza dough (store-bought or homemade, I used my no-fail pizza dough, found Here)
Mozzarella Cheese, grated
pepperoni's, chopped
tomato sauce of your choice
basil
oregano

2 tbsp butter, melted
1/2 tsp garlic powder
1/2 tsp parsley


Preheat oven to 425.  Divide the pizza dough in half.  Roll each half out very thin.  Mix together the pizza sauce, cheese, pepperonis, basil and oregano in a small bowl.

Drop cheese/sauce mixture by the tablespoonful onto one of the rolled out doughs, leaving a few inches in between each (see picture above).  Place the other rolled out dough over top of the dough and fillings, and gently press the top and bottom doughs together.  Cut squares around each of the dough and fillings, and press edges together with a fork.

Bake for about 15 minutes, until edges are very lightly browned.  While the pizza rolls are baking, make the garlic butter.  Stir in the garlic powder and parsley to the melted butter.

When rolls are done baking, brush on garlic butter.

Enjoy!


12.12.2010

Red Lobster Biscuits

Sunday afternoons.  A thing to cherish.  One of my favorite things I remember about my childhood/teenage life, until I left for college and realized that Sunday afternoons were not really all that different, except there was no one to cook for me, and I had no kitchen.  A traditional Sunday at my house consisted of church, and then coming home to a fried chicken meal that was as comforting as could be.  We (parents, brother and grandparents) would have the same meal every week, which now that I look back on it, I have no idea why we never got tired of it.  It was simple, and not that amazing, but it was what it was.  It was tradition, it was sunday dinner, and it was home.  The meal also included green beans, fresh veggies with ranch, mashed potatoes, salad, corn, and usually some sort of biscuits that were too dry or burnt black (No offense grandma, if you are reading this.)  The biscuit part is what brings me to this blog post.  I never really was a fan of grandma's burnt biscuits, and only ate them occasionally.  I don't remember bread/biscuits being made that often in my house growing up (except for the ones mentioned above), and now I have a mini-obsession with making delicious breads and biscuits that I find delicious.  Well these biscuits, are the best.  They are top biscuits.  They win.  They are a copycat recipe for Red Lobster's famous biscuits.  But now, you don't have to go and spend $50 per person just to get them, you can make them in your house!  Wonderful.  Like I said.  Win.  If only I had these biscuits to go alongside my childhood Sunday afternoon meals.  I don't even know what the world would be like.  I might would have found an even more delicious biscuit recipe, and I simply cannot wrap my head around that right now.  

Make them!  ASAP!!  Every Sunday from here on out!


Red Lobster Biscuits
from a restaurant copycat cookbook
2 1/2 cups bisquick baking mix
3/4 cup milk
4 Tbsp cold butter
1/4 tsp garlic powder
1 heaping cup grated cheddar cheese

2 Tbsp butter, melted
1/4 tsp dried parsley flakes
1/4 tsp garlic powder
dash of salt

Preheat oven to 400.  Add the bisquick and 4 Tbsp cold butter in a bowl and mix together using your hands or a pastry cutter.  Mix until there are pea sized chunks of butter.  Add cheese, milk and 1/4 tsp garlic powder.  Mix by hand just until combined.  

Press dough into a large disk.  Using a glass or a biscuit cutter, cut out rounds.  Transfer the biscuits to parchment paper line baking sheets.  Bake for 15-17 minutes, until tops of biscuits are golden.  

When they are done, melt 2 Tbsp butter and then stir in 1/4 tsp garlic powder, parsley and salt.  Brush over the top of the biscuits.  

Use all the butter : )


9.17.2010

Nacho Bell Grande

Jeremy said he wanted Taco Bell for lunch today.

I agreed that I wanted Taco Bell also, but I am currently against fast-food eating.  I am staying away from the nasty, fried, processed fast food joints at least until after the 2 half-marathon races that I am running.  I would love to make it a life style decision, but we'll see.  Doing good so far...been on a streak of about 2 or 3 months?  The same with pop.

Yes, I say pop.  I'm from Michigan.

So, instead of going to Taco Bell, I made my own version of a popular dish of theirs.

Nacho Bell Grande.
Tortilla chips covered in spicy cheese, seasoned ground beef, tomatoes, jalapenos, garlic, green onions, black beans and bacon (Taco Bell uses refried beans, sour cream, and no bacon).

That my friend, is a Nacho Bell Grande.

It's delicious.


And healthier than the drive-thru stuff.


It very much satisfied the Taco Bell craving.  Next Jeremy says I have to make the lettuce wraps from P.F. Chang's.

I went to the Chihuly display tonight, and it was pretty awesome.  Blown glass is really sweet.


My Makeshift Nacho Bell Grande recipe


1 garlic clove, grated
2 serrano peppers, minced
Handful of grape/cherry tomatoes, quartered
2 stalks green onions, thinly sliced
1/2 can black beans, rinsed and drained
Juice of 1 lime
1/2 lb ground beef
taco seasoning packet
2 strips crispy bacon, chopped
1 cup milk
1 1/4 cup pepper jack/mexican cheese
tortilla chips

Fry bacon in a skillet until cooked through.  drain on paper towels.

Mix together tomatoes, chilis, green onion, garlic, black beans and toss with lime juice.

Brown beef and add seasoning packet.

Mix milk, cheese and some pepper together in a sauce pan, and heat until cheese is melted.

To assemble:

Put tortilla chips in serving dish.  Pile on the tomato-beans mixture, and ground beef.  pour cheese over, and top with chopped up bacon.

LinkWithin

Related Posts Plugin for WordPress, Blogger...